Recording Light Is ON!
Just a little bit longer…
Last week’s Bonus Round: “"Independence Day" is a song written by Gretchen Peters, and performed by American country music singer Martina McBride. The song was officially released in May 1994 as the third single from her album The Way That I Am. The song peaked at number 12 on Hot Country Songs.[2] Peters later recorded it herself on her 1996 album The Secret of Life. It was first offered to Reba McEntire, who turned it down.[3]”
Although the subject matter and meaning of the song is pretty dark, and only tangentially related to the 4th of July, Martina McBride’s great vocals make it memorable. Capoed on 2 with just 5 easy chords, fun to play, but the vocals are waaay out of my reach.
Today I want to talk a little about beginning recording your own music, or covers of other artist’s music. The gear requirements are not too onerous for a very basic setup, but gear addiction is a real thing, so be cautious. I get most of my gear from Reverb or Amazon, but there are lots of sellers - look for special sales for the best deals.
I had a conversation with a local audio engineer/producer/recording studio owner and we talked about recording in a pro studio versus bringing in recorded “stems”. Stems are the individual vocal and instrumental tracks, either bare or with some processing, but unmixed or mixed somewhat down to a near final but as yet unmastered track. He was fine with either, happy to record in the studio, mix and then master a final recording, or mix and master stems initially recorded in a home studio. One item we discussed was “demos” - a sort of rough cut of a song to be played for an Artists and Repertoire (A&R) representative from a label or a music supervisor in a television/film production. You can imagine a young Bob Dylan or Townes Van Zandt playing a reel to reel tape of a scratchy tune, recorded in a closet or living room with lots of echo and room noises. The engineer/producer I was discussing this with said something interesting. Those type of demos don’t really exist anymore, and if they do, they’re probably not going to get much attention. With the availability of relatively inexpensive home recording gear, the people you want to hear your music are expecting a level of clarity and quality that is now possible at home. Possible, but not easy, though it can be done with some training and practice.
So where to start? A computer, preferably a laptop for positioning as close as possible to the microphone, is pretty much the center of things. “Positioning closely” is so you can monitor the progress of your recording, both on the screen showing progress, and in headphones, but also especially for cable management, which is always a consideration waiting to be a problem. Make sure all of your powered electronics are on a surge protector or power conditioner. If you’re really on a tight budget, the “computer” can be your smartphone or tablet/pad, though you’re likely stuck with the limitations of the device’s microphone. In that case, use an app like Acapella to create a “private link” audio/video of your performance. Not ideal, but better than a small voice recorder.
Next is recording software, usually Digital Audio Workstation (DAW) software of some sort. Assuming you’re using a desktop or laptop computer with sufficient speed and memory, there are plenty of choices. GarageBand is perfectly acceptable as a basic tool and can be used on a PC via emulation (and maybe native - not sure, the articles I googled were a little unclear, and I’m totally a Mac guy). There are lots of choices, and depending on which platform, range from free(ish) to pricey. GarageBand is a great place to start if you’re on a Mac, because it is reasonably seamless to upgrade to Logic Pro. Maybe not so much on a Windows based platform or Linux, though there are lots of options, I just don’t know what all of them are.
Next, microphones. If it’s just you with your voice and guitar, you may have some flexibility. If you’re using an electric guitar, great. Acoustic guitar that has electronics, great. An acoustic without electronics means you’ll need to record with a microphone pointed at your guitar. The temptation there is to just point it at the soundhole and play, but you get a lot of noise from your pick and strings which results in the “low mid mud” that can be difficult to process out. Try pointing the mic at the junction of the neck and body, or at least higher up the fretboard towards the nut from the soundhole to eliminate some of that, and at an angle usually works better than straight on. Your mileage may vary.
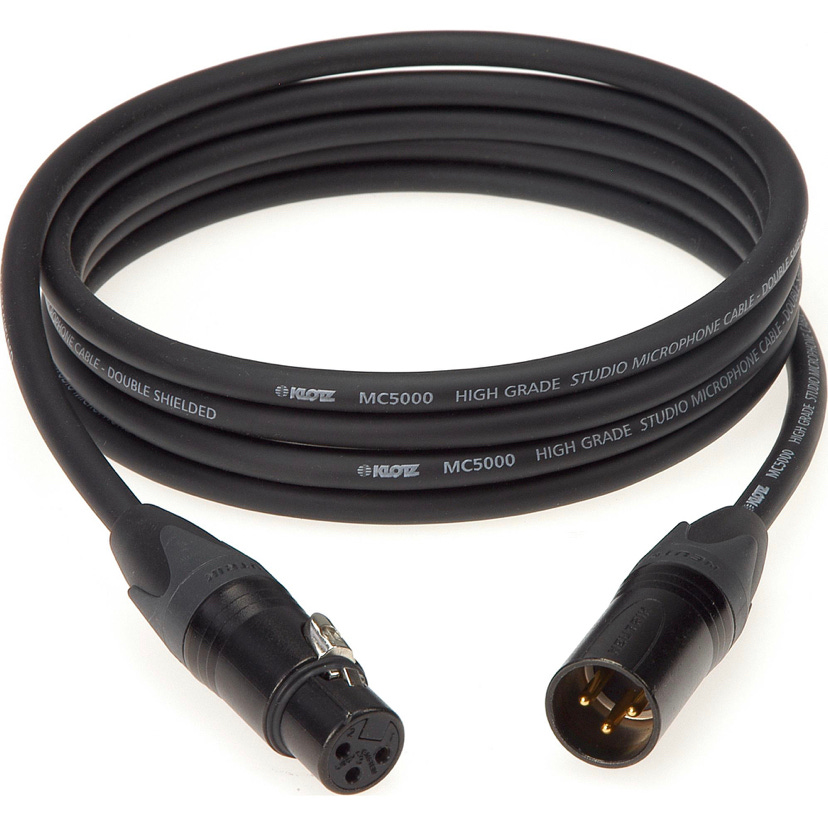
Which microphone(s)? If you can only afford one mic, it may be best to start with a USB mic that can be plugged directly into your computer. I don’t use those, so I don’t have a recommendation, sorry. If you can afford an audio interface, even a simple single or dual input like a Focusrite or PreSonus or any other of the dozens of brands (I don’t have a financial interest in any of them, or any other brands I mention on here - I have had good luck with both Focusrite and PreSonus gear - and both have learning curves), you’ll vastly increase the flexibility of the microphone(s) you can choose, though you will also have to tame the cable management monster. The reason for the flexibility is the cable connections (and hence, cable management issues). Non-USB, more professional level microphones use a connection called an XLR type cable. Those cables require an audio interface to plug into, either with an XLR connection or TRS jack connection, and then have a USB connection to your computer. The XLR connection is pretty clear, the cable end looks like this:
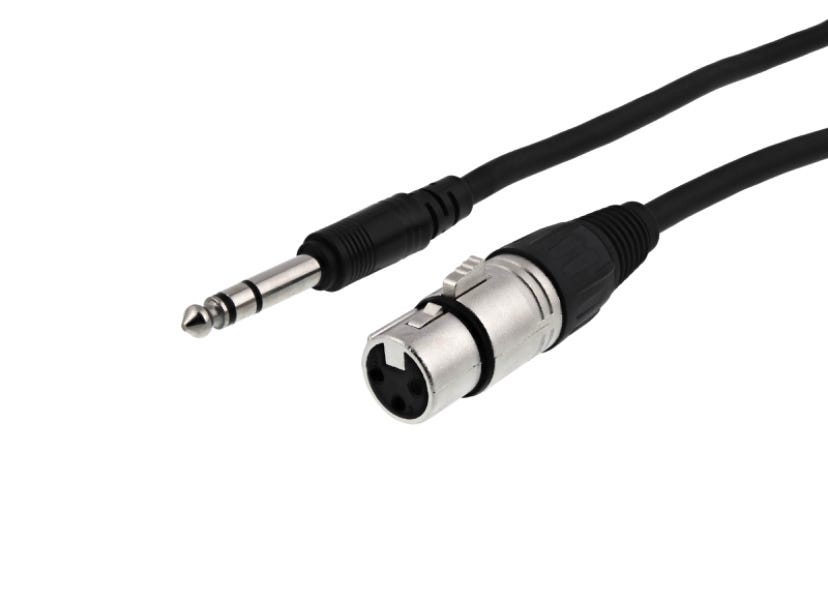
Or like this:
Either will work for connecting microphones to most audio interfaces, but note the end of the jack pin in the second photo. It has two “stripes” around the pin. Instrument cables, like the one from a guitar to an amp or audio interface only have one “stripe”. That’s because they carry an “unbalanced”, mono only, signal. They’re referred to as “TS” connections because the signal is transferred via the Tip (tip of the jack pin) and the Sleeve (the “stripe” around the pin). One of those is the actual signal, one is the ground. Instrument cables are “TS” cables.
XLR cables (with 3 pins) send and receive “balanced”signals, meaning a “left and right” signal, in addition to the ground. So, the signal sent via an XLR cable that ends in a jack pin has a TRS jack. “Tip”, “Ring”, and “Sleeve”: the extra “stripe” on a TRS jack pin is the “ring”; in conjunction the Tip, Ring and Sleeve connections carry the ground, right signal and left signal.
This is kinda important because some balanced TRS cables have jack pins at both ends, and are easily mistaken for unbalanced TS instrument cables. If something isn’t right in your signal chain, first make sure you haven’t used a balanced TRS cable where an unbalanced TS cable is needed, or vice versa. Trust me on this. The signal out from your guitar, a pedalboard or “line out” from an amp is usually unbalanced (mono), and a TS cable is needed. Mistakenly using a TRS cable may or may not work (don’t know why sometimes yes, sometimes no, some sort of electronic hoodoo I suppose).
If you can only afford one mic for both instrument and vocal, I would choose Shure or Sennheiser, though you can often find used mics of many brands on Reverb (where I get most of my gear addiction satisfied). If you can afford it, a Shure SM57 for instruments (if you need an instrument mic) and an Shure SM58 for vocals is a great combination and reasonably affordable if you go with used. Look for the “Like New”, “Excellent” and “Very Good” ones, and pay close attention to the customer ratings of the seller. A little patience on Reverb can save you a great deal of money. These mic brands aren’t endorsements, but I have used both, as well as others, and in my experience they work well. You’ll also need at least one mic stand, the Amazon Basic models are inexpensive, and more or less adequate, I’ve had good luck with Sampson and OnStage brands.
If you have a room to record in, but for expense reasons or because you don’t want to tack up acoustic panels on the walls, consider a microphone isolation shield for vocals. If your guitar has electronics, that will pretty much “take the room out” of the recording. If your guitar doesn’t have electronics, and you have to mic it, fill the room with as much “stuff” - rugs, chairs, pillows, etc, especially in the corners, as you can. The corners of the room are where bass frequencies tend to “pile up” before reflecting out rather than reflect like walls and ceilings, and the result is often the dreaded low mids mud.
So you have the gear you can afford, the room as friendly as possible, and you’re ready to record. What now? Play with it, practice, do numerous (actually nearly endless) “takes”, and then mess with it. The stock plugins (EQ, compression, reverb, etc) that come with your DAW are usually at least adequate and certainly good to learn with. Be cautious with gear addiction here, buying different plugins is good fun, but if you’re taking your stems to a pro for final mixing/mastering and your pro doesn’t have your same plugins, whatever processing you’ve done to get the sound you want to send out may be lost.
If you decide on the home recording route, whether you have your recording mastered by a pro (recommended) or not, those are pretty much the basics. DAW, interface and microphones along with a computer with adequate speed and memory are where the hardware requirements are critical (but cables, always freakin’ cables!! - I’m really partial to Pig Hogs). The rest is taking the room out as much as you can, and then just practicing recording as much as possible with numerous takes and different songs before you do a mastering worthy take. Remember to take breaks every half hour or so when you’re mixing/processing - your ears “wear out” around then and you just need to walk away for a few minutes and come back with “fresh” ears. Have fun!!
Bonus Round: The roadies don’t mind…
Cheers, and keep playing!! And recording!!
Michael Acoustic


